photo banner2_zpsd42f5f4b.jpg

Tuesday, August 5, 2014

EGD Group Project: Brotzeit


For our last page, my group has decided to do something different. The restaurant that we will be reviewing will be Brotzeit and since the the way the sign is placed at the 313 outlet, we have decided to design the last page of our newsletter so that it will be in landscape form.


This is something different from the other pages in our newsletter so it will help make the layout more interesting so it won't just be the same thing repeating itself. Again, we have decided to use a different grid layout as it adds more variation. More so since we will be spreading out the use of the two different layouts. This means that when people read our newsletter, the layout of the pages will vary because we have chosen to use different types of grids.

For the Brotzeit page in our newsletter, we will be talking about October Fest. Since it is both a restaurant and a bar and our target audience are youths and young adults, we find it appropriate as people who enjoy drinking or who want to visit the restaurant will be interested in knowing what offers they have and what they will be selling.

Monday, August 4, 2014

EGD Group Project: Loyalty Membership Card (Page 4)


This is the layout that my group has managed to come up with for our loyalty card page. As you can see, instead of using the same template as before, we have decided to change things up a bit so as to make the newsletter more interesting visual-wise. We have decided to use this template as it is both easy to work with and because it incorporates the golden ratio into it. This helps ensure that if used correctly, the layout will look neat and balanced.

The most difficult part of this page would be creating an image of the actual loyalty card. We have decided to use this opportunity to incorporate some photoshop skills into our project. We have taken ideas from other popular membership cards and from these we will be creating and designing our very own card with the help of photoshop.

Also in the template, we have put aside sections to further explain the benefits of the cards, offer special discounts and we have also included the terms and conditions to not only make it seem more realistic but also because we think that it is something that is important and that it is something that people would be interested in knowing.

The Isetan membership card is an example of a card that we have made reference to because it looks classic and elegant which is what we want to achieve since our newsletter is also aimed at young adults.


Sunday, August 3, 2014

EGD Group Project: Forever 21 (Page 2)


This is the layout that my group has come up with for the second page of our newsletter which is on Forever 21. This page was designed according to the grid that my group has previously chosen. My group has decided to alternate the texts and the pictures that we will be using so that the page will be balanced. This ensures that neither sides of the page will be just full of texts or pictures. This also helps make the page look less clutters and boring. We have also decided to add in a funfact section to our newsletter as we think that readers will enjoy it instead of just reading rows and rows of information. The pictures chosen also represent the different major sections of the store such as the accessories and swimwear section. This will help to inform people about what they can expect to find in this particular outlet.

Friday, August 1, 2014

EGD Group Project: Content

During our EGD lesson this week, my group managed to finalise the content of our newsletter. 

Page 1: Cover Page
Page 2: Forever 21
Page 3: Le-Way and Limited Ed
Page 4: Loyalty Card
Page 5: Event
Page 6: Event
Page 7: Marche review
Page 8: Brotzeit review 

 When we first started planning our newsletter, we initially planned to just do it on the stores and just include information about it. However, Ms Tay reminded us that it was suppose to be a newsletter and not a catalog. Therefore, we have decided to change it to only 2 pages about the stores. Following that, we have decided to create a 313 loyalty card and promote it in our newsletter so that readers will be aware of it. The next two pages will then be about the events that are constantly held at 313 somerset. On the first floor of the mall, there is a small space where companies can rent and use to promote their causes or products. It's these kinds of events that we will be writing on as the events change with the months. Another 2 pages will be dedicated to restaurant reviews. My group believes that this is something that people who want to visit the mall will be interested in reading as they would want to know where the best places to eat are at. 

The three stores that we have chosen to cover have also been very carefully thought out. We have chosen Forever 21 as the Forever 21 outlet in 313 is the biggest one in Singapore as it has a total of 4 levels. Le-Way and Limited Ed were also chosen as they are not very common stores that can be found in Singapore. The Le-Way outlet in 313 is also the only outlet in Singapore. These stores have also been picked because Forever 21 will appeal to the females while Le-Way and Limited Ed will appeal to the males.

Wednesday, July 30, 2014

EGD Group Project: Cover page


This week in our EGD lesson, my group managed to come up with the first draft for our front cover of our newsletter. Basically we were able to put together all the parts of the cover page that we wanted. We wanted to put in the title, the month issue, the name of the mall and a picture of it. A few weeks earlier, we had all gone dowm to 313 somerset to take photos of the mall. However, after looking at all our photos and the different parts of the cover page that we wanted to have, we quickly ran into many problems.

Firstly, the original photo that we took looked like this, 


we purposely took it this way because we wanted to show both the name of the mall and the people walking in and out of it. However, we did not want the people to be so clear as it might overshadow the name of the mall which already wasn't that noticeable since it was on glass. 

When we tried to put the picture as the background, we realised that either our title or the name of the mall would end up covering the words "313 @ Somerset" in the picture. We tried to fix this problem by cropping away the words in the photo (as seen in the first draft of our layout) but the picture lost it's meaning as the because without the words, people would not be able to tell what mall it was at first glance.

Secondly, Ms Tay also brought up the fact that we should have real people in our photo instead of just the silhouettes of them as it would make it seem as though more people were visiting the mall.

Because of all these problems that we've encountered, we've decided that the best way to fix it would be to change the picture altogether. 

Tuesday, July 29, 2014

Newsletter Cover Pages


After looking at examples of many newsletters, my group has decided to do something like the pictures above. We have chosen to put our newsletter title at the top of the page, followed by a picture of 313 somerset in the background. Lastly, we will be adding in some information about what people can expect to find in our newsletter at either the side or the bottom of the page.

We have decided to do something very clean and simple for our layout because we want the main focus to be on the mall itself. We also don't want to put readers off from our newsletter by making it cluttered and crowded. But at the same time, we still want readers to be able to know what can be found in our newsletter without having to open it. Thus we have chosen something that looks very neat and organised.

Thursday, July 24, 2014

EGD Group Project: Grid Layout


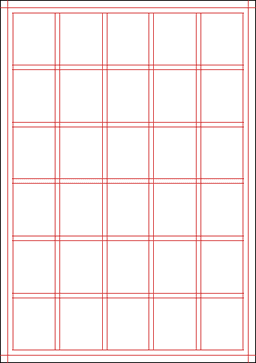
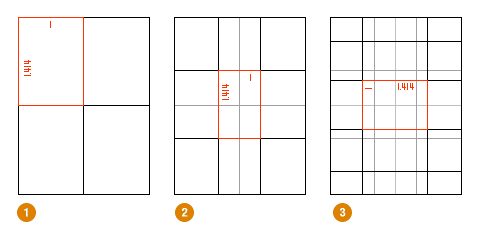
For our main grid design, this is the one that my group has chosen to go with. The first reason would be because it is easy to understand and easy to work with. The lines are all straight and can be used together with the boxes to choose where we want to put pictures and texts. The second reason why we have chosen this grid would be that it is also very versatile. There are many different ways that we can play around with it and make up different layouts. For example, the entire grid can be maybe used to just talk about one thing or, it can be very easily divided so that we can use it to talk about 3 different things. The last reason why we chose this grid would be because it is easy to manipulate this grid so as to make everything either balanced, or to draw attention to a certain portion of the grid. By dividing the grid equally, everything will look neat and balanced and by dividing the grid into 3/4 and 1/4, attention will immediately be on the 3/4 part of the page and that can be used to maybe talk about something that is more important than the information on the 1/4 part of the page.

Monday, July 21, 2014

EGD Group Project: 313


For my groups EGD project, we have decided to create a newsletter on 313 somerset. We chose 313 somerset as it contains a lot of interesting shops that we can share information on and also it actively holds many small events for companies such as VISA or World Wide Fund for Nature (WWF). With our newsletter, people would be able to keep up to date with what is happening at the mall and about the special promotions that might be going on. For the colour scheme, we plan to go with purple and white as those are the colours that are widely used in the mall. By using the same colours as those that are used in the mall, people will be able to see the relation that we have with it. As the shops there are mostly catering to the youths, they too will also be our target audience. Therefore, when writing our newsletter, we must ensure that it is not too wordy and that the information given is something that youths will be interested in reading. The layout must also be easy on the eyes and uncluttered as if not, people will not be interested in reading out newsletter.

Thursday, July 17, 2014

The Golden Ratio: Examples


Even though this is not a newsletter, I feel that from this example of how the golden ratio is used, I can still incorporate it into my project. Using this example, they show how the main 60% of the page is what they want people to first see and the remaining 40% consists of the smaller details. This ending point, where people also tend to focus the most at, would then be the SALE- FINAL REDUCTIONS sign. I can use this in my newsletter as instead of adding in too many words and cluttering up the whole page, I would fill the first 60% of the page with a picture then then the other 40% would be text giving information that relates to the picture. The ending point could then maybe be a title or a logo. 


Another example would be this. My first 60% could be a picture and some texts while the remaining 40% could be a side bar that contained less important information. By applying the golden ratio, I am not only ensuring that the layout of my newsletter is clear, I am also ensuring that all the main points of my newsletter are highlighted and that they are not overshadowed by the less important parts.

Wednesday, July 16, 2014

The Golden Ratio


Every since learning about it, the golden ratio would definitely be one thing that I would like to use in my newsletter. I find it interesting that even though it is not meant to be balanced, when used correctly, this ratio still managed to make a complete design look balanced. It also helps draw focus to key points on the page and thus making it easier for you to plan where you would want to maybe put the company's logo for example. The golden ratio also shows you where the main part of the whole design should be at and this would be where you could possible put a picture of the product that you are trying to sell or the place or event that you are talking about. This main part would be the first 60% or so of the page as that is where people tend to look at most of the time.

Thursday, July 10, 2014

XPRESS Newsletter

Today in EGD, we were told to recreate a newsletter. With this project, I was able to familarise myself more with the the text box tool and the alignment tool. I find the text box tool in InDesign extremely useful and easy to use as I can simply draw text boxes anywhere I want as long as it is in the page. This makes it easy for me as I am able to easily design the page according to how I have planned it. The text alignment tools are also very useful as they help me create the different effects that I want my text to have like for example, if I want them to be all center aligned or all to the side. I also learned about how much boxes can be used to segment different parts of the newsletter. By adding in boxes, it makes it easier for people to differentiate the different components of the newsletter. Lastly, I also learned how to import and move photos around using InDesign.

Tuesday, July 8, 2014

Grid System


Today during EDG we learned about the grid system itself and how to fold it. The grid system is used to ensure that the design and layout of a newsletter or any other piece of work is balanced and neat. Every line in the grid shows where a picture or piece of text can be placed so that it will look uniformed and in place. This is important as it will help me and my group to be able to plan where we want to put the different elements of our newsletter at. This will make creating the newsletter even easier for us as we will already know where all the different components are suppose to go. And with the help of the grid, we will also be able to make sure that everything looks nice and in place.

Sunday, July 6, 2014

InDesign


This week during our 3 hour tutorial, we learned how to use InDesign to create newsletters. I personally find this very useful as I previously was only able to make newsletters by following the templates that were given to us on Microsoft word. I learned how to use the different tools to do things such as make the words go around a photo, add in multiple columns and make the first letter of the first word in a paragraph larger than the others. This would allow it to stand out more and thus capturing attention. One thing that I really like about InDesign is that it is really easy to create text boxes. The size and shape of the text boxes can be very easily manipulated and this makes it easier to design a whole newsletter.

Saturday, July 5, 2014

EGD Assignment FINAL


This week I finally managed to hand up my assignment and this is my finished product. As mentioned in my last EGD assignment update, I used the brushes to add extra texture and dimension to the advertisement. In the original photo shoot that Demi did for her album, she was seen with ink smears and splatters all over her body and so I decided to incorporate that into my work as well. I also changed the opacity of the brush strokes so that they would not be so harsh and thus allowing them to blend into the piece more. I also learned how to download brushes off the internet and load them into photoshop and that was how I was able to achieve the paint splatter marks.

Another change that I also made was that I extended many of the lines but I made sure to use layers so that they would not overlap neither the album cover nor the picture of Demi. This helped make the advertisement seem more complete rather than two separate pages.

Thursday, June 26, 2014

EGD E-Learning


For this weeks EGD e-learning, we had to finish 1 out of 4 tutorials that were posted on olive. Since I'm quite a new of photoshop, I decided to just do the easiest tutorial and learn more of the basics. Even though it was stated as an easy mode tutorial, it was nothing but easy for me. I found it hard to understand quite a number of the steps but after consulting youtube for photoshop tutorials, I was able to figure most things out. 

I find this tutorial extremely useful as one of the things that they focused on was how to use brushes to add in texture and dimension. At first, my piece looked really dull and 2D as it was all just a solid black colour. However with the brush tool, I was able to splatter some portions of greys, black and white all over the piece. The splatter effect also helped make the piece look as though it would have an interesting texture if you were to touch it.

I also plan to use this in my EGD advertisement as now, there are a lot of white spaces and the piece looks very 2D and it does not stand out as much as I would like it to.

Tuesday, June 24, 2014

EGD Assignment Update Part 2

For the words "DEMI LOVATO" and "Featuring the single "Give Your Heart A Break"", I used the font Gills Sans because it looked similar to the font used on the cover of Demi's album. I also changed the spacings in between the letters to mimic the design of the album cover. This was done using the tracking tool. The outside of the album was also outlined so that it would stand out more from the background. This was done by drawing lines around it and then changing the stroke size. Lastly, the line that says "Now Available On iTunes" was also changed so that it would be the same length as the bottom side of the album. This helped make it look neater and it was also done using the tracking tool. 

For the other parts of my poster, I was planning to maybe use some brushes to add some texture and dimension to it. I got this idea after learning how to use the brush tool in photoshop during this weeks elearning. It not only helped to cover blank spaces but it also made the piece look more vintage and less 2D.

Saturday, June 21, 2014

The Fault In Our Stars


Recently I got the chance to watch The Fault In Our Stars and I was impressed with not only the movie, but the poster. The one thing that I really liked about this poster was the layout of it. To me, the words and the images have been placed perfectly and they not only balance the whole thing out but they also compliment one another. If you were to draw a line horizontally midway in the poster, you would be able to see that it is balanced. The top with the image of the two main character and the bottom with the words and the background of the grass. Another thing that I really like about this poster would be the colours. Everything looks to bright and vibrant and it is definitely what caught my attention in the first place. The way the colours both have contrast but still manage to compliment each other. An example would be the cool blue of the words against the vibrant green of the grass. To me, this poster was just designed just as perfectly as the movie was directed.

Friday, June 20, 2014

EGD Assignment Update


So far, what I have done is that I have used PhotoShop to isolate certain images so that I could use them without the background. In order to do this, I used the magnetic lasso tool. At first I was having a lot of trouble with this tool as I could not select the whole image and some parts would get cut out. However, I've learned that in order to fix this problem, all I had to do was to increase the frequency so that the computer would be able to pick up more shades and tones of the different colours. Next I used the line tool to draw lines on the right side of my advertisement. I did this as it is the same design that can be found on the DEMI album CD. This would help link the advertisement to the album and also it was a good way to fill up the blank spaces without overpowering the main point of the whole poster. Lastly, I used text tool to add in some words. 

Next, I will be adding in more typography to give my audience more information about the product. However, I need to remember that it cannot be too fancy or it may overshadow my images which are suppose to be the main focus of my advertisement.

Friday, June 13, 2014

Lyric Videos

I used to think that graphic design only applied to posters or advertisements but now after learning more about it, I can see that it is important even when creating a video. Lyric videos to be exact. When an artist releases an official music video to one of their songs, it is up to graphic designers to best portray the song through pictures and words. This can been seen very clearly through the lyric video that was recently released for 5SOS's new song "Don't Stop".


Another type of lyric music video that is very common would be those that only contain words. Now, with the help of graphic design, people are able to creatively flash the lyrics on the screen instead of just rolling them out in a form of credits like they used to do. Designers are now able to arrange the words so that they flow and this not only makes it look better, but some words can also be portrayed differently in order to give them more emphasis. An example of one such video would be the one made for The Ready Set's "Young Forever".


Tuesday, June 10, 2014

Demi

 DEMI album cover


DEMI CD design

After having more time to think about my EGD project, I have decided to change my entire idea and do a poster on Demi Lovato's album, Demi. While I was overseas I managed to go to many CD shops and I got to see many albums from different bands. One thing they all had in common was that the graphics used to design these albums was simply incredible. Most of the albums that I saw had very simple designs and the designers made sure that focus would not be drawn away from the artist. I plan to adopt this feature when doing my poster as I do not want people to notice other things before the artist. In order to achieve this, will be using white spaces in my advertisement to capture the attention of the audience.

Thursday, May 29, 2014

Typography


After doing some research on google, I managed to find this piece of typography and I thought that it would be relevant to my project since I was creating an advertisement on Nerds candies. This would be a good way to catch the attention of my audience as it is colourful. Once the audience is attracted to the colours, they will eventually take a closer look and start to realise that it is made up entirely of small sweets. For my project, I was thinking of doing something similar. I will be attempting to create a tagline for the candy and then creating it out of small pieces of Nerds sweets. This will help catch the attention of my audience as it is something different, colourful and interesting. 

EGD Project: Road and Nerds

Before

After

For my EGD project, I have decided to make an advertisement on Nerds Candy. I wanted to make the pieces of candy walk down an isle all the way to a castle. I also wanted the place that they were in to look like a candy wonderland. I then took a picture off of google and started editing it. By using illustrator, I was able to change the colour of the road. I made it pink to give it the cotton candy feel and then I also gave it a gradient effect so that it would look more 3D and less flat. After I  was happy with the colour, I went back to Photoshop and used a clipping mask to give road a brick texture. This helped bring it to life and made it look more realistic. Next, I started on creating the little Nerds candies. From referencing a picture of them, I created their shape with several circles in illustrator and then put the overlapping circles together to create one whole shape by using the pathfinder. I then coloured the shapes in and gave them some shadows to make them look less 2D. 

Next I will be concentrating on changing the colours, sizes and placements of the candies as not all the Nerd's sweets look the same. I will also be changing the things in the background to look more like a candy wonderland. 

Sunday, May 25, 2014

Photoshop lesson 1


This week, during our 3 hour lesson of EGD, we learned the basics of photoshop. I learned how to use both the blemish removal tools and the liquify tools. By using the blemish removal tools, I was able to remove the lady's spots and wrinkles that were around her eyes and mouth. I was also able to remove a lot of the discolouration under her eyes by using the tool to pick up lighter skin tones and then going over the darker ones. Then, using the plumping tool I was able to give her fuller looking lips. Lastly, with the liquify tool I was able to reshape her face to give her a sharper chin, a wider smile and slightly higher cheekbones. I was also able to bring down her hairline and reshape her eyebrows. These skills are very useful as if I wanted to use a photo for my advertisement but it is not perfect or the way I wanted it, I could simple use Photoshop to change it and edit it to the way I want it.

Advertisements


This week in EGD we learned about how to properly place different elements of our advertisements. This is important as if you do not correct place the different parts of the advertisements at the right place, it will not leave a long lasting impression. For example, when looking at an advertisement, our eyes usually start from the top and then work our way down. So in the case of this Heinz Hot Ketchup advertisement, they started with a blank background to bring focus to the center of the advertisement. The designers then put in a picture that related to the product but they also kept in mind that it should not be too big so that it overpowers to logo at the bottom right of the advertisement. The bottom right of a page is where our eyes will usually end so by putting the logo there, it makes sure that that would be the last thing that the audience sees and thus it will be the thing that they remember the most.

Saturday, May 17, 2014

Gradient Tool: Ant


The gradient tool was one of the harder tools to use as I found it hard to control the amount of blacks, greys and whites that were needed to make the ant look realistic. However, after many attempts of trial and error, I was able to successfully complete half on my ant. This is a useful tool and it will come in handy when creating my poster as if I need to draw something, I can use the pen tool (that I learned to use last week) to outline the drawing and then I can use the gradient tool to add dimension and bring the drawing to life. The gradient tool has definitely made a big difference in my drawing of the ant as if I were just to use solid colours, it would look flat and unrealistic. 

Controversial Advertisments


This week during our EGD lesson, we learned about controversial advertisements. In my opinion, some controversial advertisements such as those condoning child abuse were alright. I feel that even though they were a bit graphic, they managed to get the right message across and it is the fact that they are graphic that will leave an impression in the minds of the public so as to put a stop to child abuse. However, advertisements such as the one above are not alright to me. In this advertisement, the words say that "All Animals Have The Same Parts" and then it is followed by a picture of a woman. The fact that they are comparing women to animals shows just how degrading this advertisement is. When I first saw it, I was also not able to tell what the advertisement was even for until I read the small words at the left side of the poster that says,"Have A Heart, Go Vegetarian". This just proves how ineffective this advertisement is unlike that one on child abuse. There is a fine line between an advertisement being successful and controversial and when creating my poster for our individual assignment, I must remember to keep this in mind.

Child Abuse Advertisement

Sunday, May 11, 2014

Pen Tool: Dog


In our second lesson of EGD this week, we learned how to outline and colour in pictures that we can trace off templates. This is a useful skill as now we no longer need to draw out our pictures free hand. Above, I have inserted a picture of the dog that I outlined and coloured using the pen tool. It took a bit of getting used to but I eventually was able to easily draw and manipulate the lines and curves to make my desired shape. However there are still some parts that were not outlined properly and they became even more obvious when I had to colour the picture in as there are some parts with the white background showing through. If I have to use this technique in my individual assignment, I will ensure that I am more careful will outlining the template. I will also constantly use the "zoom in" tool to ensure that my lines are all in the correct place. This will allow me to have a better end result as there will no longer be any white spaces with the background showing through.

Saturday, May 10, 2014

Logos


This week in our essential of graphic design class, I learned about the importance of logos.
I also learned about how the principles of effective logo design helped to ensure the success of a logo. The five principles of logo design are:
1. Simple
2. Memorable
3. Timeless
4. Versatile
5. Appropriate
From the picture above, I understood just how successful these logos were as even though they were incomplete, I was still able to identify most of them. Most of the logos are basically just simple and colours are also used to make them memorable. The colours also help ensure that the logos stand out from one another. The principle of being timeless is also something that logos such as Carlsberg and Breitling use as the logos of these companies have not changed for as long as I can remember. This is good and important as if a company constantly changes it's logo, people will start to get confused and it will be less memorable. 

This shows how just much effort actually goes into one logo as it is the face of the company and a lot of thought needs to be put into it to ensure that it helps set the company apart from the rest.

Saturday, May 3, 2014

The Amazing Spiderman

The Amazing Spiderman artwork

Just yesterday I managed to catch the second installment of The Amazing Spiderman series and I absolutely loved it. The storyline was perfect and I would not think twice about watching it again. After the movie, I was scrolling through my twitter timeline and I saw this amazing piece of art. I'm not sure who exactly drew it but I must say that I was impressed at the layout and design of the drawing. In the movie, this was the scene when Spiderman failed to save his girlfriend, Gwen Stacy, and in my opinion, the artist managed to capture perfectly every emotion that I felt when watching the movie. 

Firstly, the artist used white spaces to show how raw and plain the scene was. Even though the drawing is so simple, you can almost feel the emotions that the characters felt. How empty Spiderman must have felt seeing Gwen's lifeless body just hanging there. The white spaces also help make sure that all the attention is given to the characters instead of whatever that could have been in the background. Another thing that the artist did was to create a contrast between the words and the drawing. The drawings were coloured in which caused the black words to stand out. This would ensure that they would not be over- shadowed and that they would still be noticed. Lastly, a strange sense of balance was also installed into this art piece as since the drawing is not exactly in the middle of the paper, the words towards the side helped balance it out and sort of pull everything together making it beautiful even though there are only two elements to the drawing.

Nothing Personal

All Time Low "Nothing Personal" album cover

All Time Low is one of my all time favourite bands and one of my favourite albums from them is undoubtedly "Nothing Personal". The music in the album is great but I would be lying if I said I wasn't the least bit bias to it because of how great the album cover looks.

The first thing that I like about the album cover is the pattern in the background. This helps the cover seem less ordinary and plain as if you're not looking at the middle of the cover, there's still something else to look at as compared to just a plain solid coloured background. The next thing I like about the cover is that the designers put a lot of effort into emphasizing the band and album name. Instead of just putting the band and album name on the patterned background, they put it against a white background to help it stand out more and thus helping to capture the public's attention. The last thing that I like about the album cover is the fact that everything is balanced. If a line is drawn horizontally through the cover, you will be able to see that the album is perfectly balanced. From the images surrounding the band and album name to the birds at the top and the paint splatters at the bottom of the album.

Transcendence

Transcendence movie poster

The past week I managed to catch the latest Johnny Depp movie Transcendence. It was generally a good movie and I enjoyed the storyline a lot however the movie was undoubtedly too draggy. The only reason why I was actually drawn towards this movie was because I had first seen the poster a few weeks earlier. And in my opinion, if you want to watch a movie solely because the poster captured your attention, then I think the designers deserve a round of applause because they have managed to do their job. 

The first thing that I like about this poster is the fact that the entire picture is basically just a photo of Johnny Depp. This was a good move on the designer's part as he is a well known actor and it was almost as if the designers were trying to advertise him more than they were trying to advertise the movie. By doing this, they have managed to capture the attention of Johnny Depp fans and this will cause them to want to watch the movie in order to support their favourite actor. Another thing that I really like about this poster is that it is very balanced. The designers even drew a line down the middle of the poster to show you just how balanced it is. It gives the poster a very nice and clean feel. The last thing that I like about the poster is that it uses a pattern on one side of it. The pixel pattern that is used on the left side of the poster makes it look more interesting and thus causing it to be more attention grabbing. However, since it is only on one side of the poster, it is subtle enough to grab the attention of the viewers ever so slightly to cause them to have to take a closer look before they are able understand what exactly is going on in the poster.

Saturday, April 26, 2014

500 days of summer

500 days of summer poster

500 days of summer has always been one of my favourite movies and when I saw this poster I immediately fell in love. Even though it is simple, it's still eye catching at the same time. The designers who created this made use of white spaces around the picture to draw focus to the two main characters on the bottom right of the poster. The contrast in colour between the characters and the background also helped make certain that they would be the main focus of the entire picture. Another thing the designers did to draw attention to the two main characters in the posters was that they purposely made it unbalanced. Instead of adding text or putting the two main characters in the middle of the poster to balance it out, they put them towards the bottom right of the poster. This imbalance will cause more people to notice the poster as it will seem odd and out of place.